The new alloy gear carburized steel 17CrNiMo6 steel is used more and more widely, but its many basic properties such as process characteristics are lacking. In this paper, combined with the actual needs of production, the depth determination of the carburizing layer of the heat treatment process of a foreign manufacturer 17CrNiMo6 steel is studied, which provides a theoretical reference for the connection of the hot and cold process of the alloy gear carburizing heat treatment and the determination of the depth of the carburized layer.
1. Test materials and methods
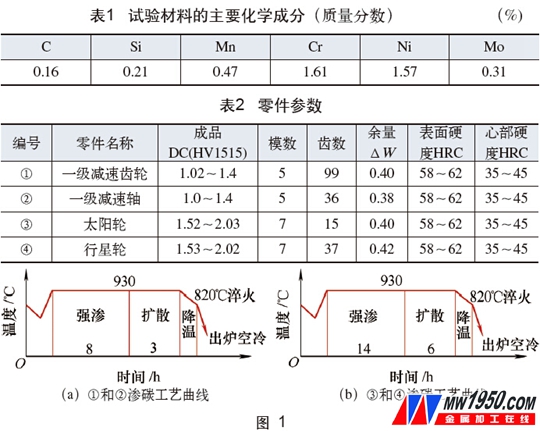
(1) The material selected for the material is 17CrNiMo6 steel. The main chemical composition is shown in Table 1. The parameters and requirements of the four typical parts are shown in Table 2. Other requirements include surface carbon content of 0.75% to 0.95%, and carbide maximum length of 0.02μm. Continuous or semi-continuous carbides are not allowed, non-martensitic structure ≤25μm, grain size 5, effective hardened layer depth decreased by 0.1mm, hardness reduction should be less than 35HV.
(2) Test and testing equipment Aichelin 5/3 type multi-purpose furnace, effective size 900mm × 1500mm × 1050mm, maximum working temperature 950 ° C, heating power 255kW, maximum loading capacity 1500kg; metallographic microscope and micro hardness tester.
(3) The test process adopts direct quenching process after carburizing, 1 and 2, 3 and 4 are in the same furnace, and the metallographic test sample adopts the same modulus block sample cut on the physical part. The process curve is shown in Fig. 1a. As shown in 1b, the strong carburizing potential is 1.05% to 1.1%, and the diffusion carbon potential is 0.65% to 0.75%. The heat treatment process is controlled by computer on-line, the furnace temperature uniformity is ±5 °C, and the carbon potential uniformity is ±0.02%. After carburizing and quenching, two 150 ° C tempering treatments were carried out.
2. Test process results and discussion
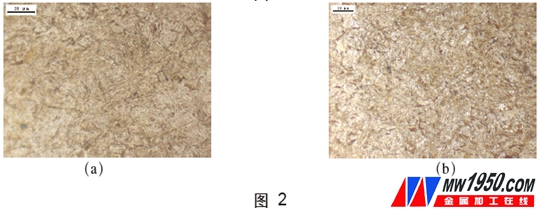
(1) Sample test results Organizational morphology: m5 tooth block samples of parts 1 and 2, metallographic microstructures of m7 tooth block samples of parts 3 and 4 are shown in Figures 2a and 2b, respectively. Needle martensite + a small amount of ferrite + a small amount of retained austenite.
In the 17CrNiMo6 steel, due to the presence of alloying elements Cr, Ni and Mo, the hardenability of the steel is greatly improved. Therefore, after carburizing, quenching and tempering, the core can be almost completely converted into low carbon martensite, and Cr and Mo are The carbide forming element makes it difficult for the austenite grains to grow and coarsen when quenched and heated. Therefore, after the steel is carburized and quenched at 820 ° C and tempered at 150 ° C, the layer can obtain fine needle-shaped martensite. Tissue + a small amount of retained austenite, while the heart gets low carbon martensite.
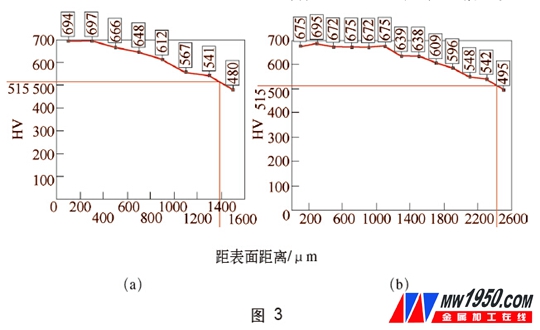
The hardness gradient curve of the m5 tooth block is shown in Fig. 3a. The depth of the carburized layer is CHD515=1.38mm, and the hardness decreases by a maximum of 27HV for every 0.1mm decrease. The hardness gradient curve of the m7 tooth block is shown in Fig. 3b. The depth of the carburized layer is CHD515=2.41mm, and the thickness of the layer decreases by 0.1mm, and the hardness decreases to a maximum of 18HV, both of which meet the requirements.
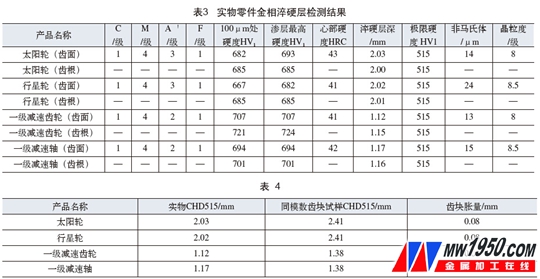
(2) Test 4 kinds of physical parts into finished products. The test results after breaking the real objects are shown in Table 3. The metallographic photomicrographs are shown in Figures 4a, 4b, 4c and 4d, and all the indicators are up to standard.
(3) The comparative analysis of the sample and the physical carburized layer is shown in Table 4. The same modulus of the tooth block is within 0.10 mm.
3. Test conclusion
Similar to the 17CrNiMo6 steel gear, on the basis of the current carburizing process, when the same modulus of the tooth block sample is used as the metallographic and hardened layer depth inspection, the heat treatment carburized layer depth is the finished hardened layer depth plus the common normal The balance, plus the amount of expansion of about 0.10mm.
About the author: Tang Fusheng, Hangzhou Qianjin Gearbox Group Co., Ltd.
HOT SELLING MEASURING TAPE
Custom Fiberglass Measuring Tape,Metric/Inch Digital Fiberglass Measuring Tape,Custom Metric/Inch Fiberglass Measuring Tape
HENAN BONTHE MEASURING TOOLS. CO., LTD , https://www.tapemeasurebte.com


