When it comes to the heat-deformation control of the easily deformable gear or the high-precision synchronizer sleeve and the bridge tooth, the craftsman often thinks of the mature process that is currently used internationally and includes the press-hardening process: the hot semi-finished product → Carburizing → pressure quenching → tempering.
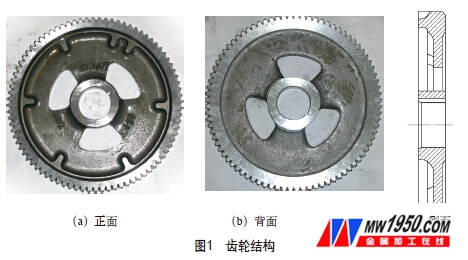
Although this heat treatment process does have a good effect on controlling heat treatment deformation, the cost of performing the pressure quenching process is relatively high, and the process cycle is elongated, which is not conducive to efficient production, which is in the market today. In such a fiercely competitive environment, it has become a very headache for manufacturers. Therefore, for some specific gears, it is necessary to try to control the deformation of the gear after carburizing and quenching to within the technical requirements by an improved control method. The workpiece shown in Figure 1 is a camshaft gear for a certain engine assembly plant in China, which belongs to the mass production parts of our factory. The material of the gear is 20CrMnTiH, although the web surface is not very narrow, but only 11mm thick, it is a typical asymmetric small diameter structural member in structure.
1. Camshaft gear heat treatment requirements
Surface hardness 57~62HRC; core hardness 25~45HRC; effective hardened layer depth 0.61~1.2mm (including 0.2mm grinding amount), effective hardened layer depth evaluation limit is 515HV1; metallographic requirement carbide 1~3 grade; Markov Body and retained austenite 1 to 3 grades.
2. Grinding process after heat treatment
Positioning with the rear end face, grinding 7 signal tables on the front of the gear; then positioning with 7 signal tables, grinding the end face; finally, positioning with the rear end face, grinding the front end face. Since the seven signal stages function as signals, it is necessary to ensure strict size requirements (±0.1 mm) of the seven signal stages.
3. Determination of heat treatment process
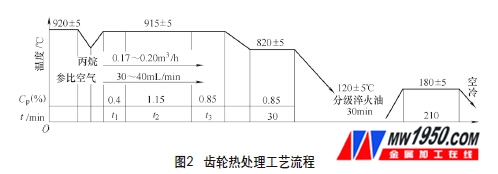
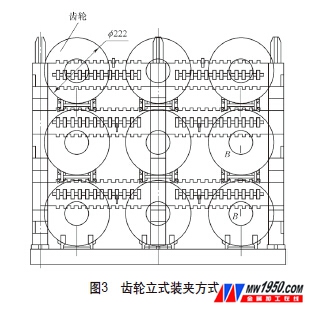
Considering that the gear is a structurally asymmetrical workpiece, the material is ordinary carburized steel and nickel-free steel. In order to meet the scheduling demand of up to 8,000 pieces per month, and to shorten the process cycle, we have selected The process flow is in accordance with the typical carburizing and quenching process, that is, the heat treatment method of cooling after carburizing and directly quenching after a period of heat preservation, as shown in FIG. 2 . The heat treatment equipment of the gear selects the RTQF-13 IPSEN single-door multi-purpose furnace production line (3-1-2 line), and the furnace loading method adopts the traditional tooling fixture vertical assembly, as shown in Fig. 3. The overall process flow in the early stage of gear development is: forging → rough isothermal normalizing → hot pre-processing → carburizing quenching → tempering → cleaning shot blasting → grinding processing → final inspection → cleaning rust prevention → packaging into storage.


4. Quality problems in heat treatment
Although the metallographic inspection project of the gear after heat treatment can basically meet the technical requirements, the effect on the heat treatment deformation control is poor at first. After the heat treatment, it was found that the middle hub surface of the gear was distorted and the seven signal stages could not be successfully ground, and the difference in size of the different batches of gears after heat treatment was also different.
Around the heat treatment deformation of the gear, we have done a lot of work to optimize the process from the raw material inspection, isothermal normalization, optimization of carburizing process parameters, and the combination of hot front dimensions. Finally, we improved the consistency of the deformation trend of different batches of gears after heat treatment in the control of the deformed parts after heat treatment, but the control effect on the deformation of the gear hub surface is still not satisfactory.
5. Handling of semi-finished parts and production site problems
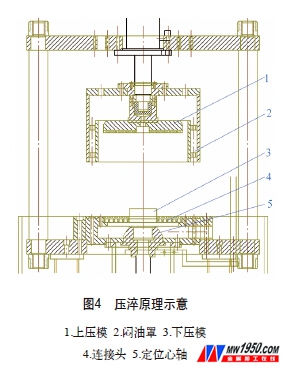
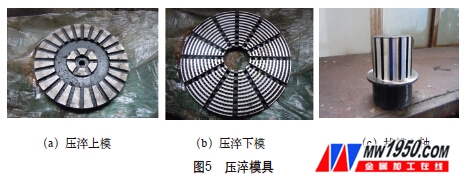
If the black skin will be scrapped after the gear heat treatment is deformed, the gear will be scrapped. Therefore, some of the deformed parts are accumulated in the warehouse, the knife cannot be moved, the finished product cannot be produced, the profit is not generated, and the inventory is occupied, and the production site is still producing the same. The problem is the hot after the semi-finished product. To this end, we use the existing rotary hearth furnace and single station quenching press resources in the factory, and design the quenching die according to the structural characteristics of the camshaft gear, as shown in Figure 4 and Figure 5.
After the above equipment is used for the quenching of the semi-finished products, the protruding hub surface can be flattened to ensure smooth post-heating grinding. At the same time of pressure quenching, we have roughly calculated the cost of pressure quenching:
Energy consumption cost: the total power of the rotary hearth furnace is 128kW, the industrial power is 0.72 yuan/kW·h, the energy consumption is 128×0.72=92.16 yuan/h; the total power of the quenching press is 48.1kW, and the industrial power is 0.72 yuan/kW·h. The energy consumption is 48.1×0.72=34.632 yuan/h.
Methanol cost: The flow process requirement is 2~3L/h, the purchase price is 4 yuan/kg, the density is 0.8kg/L, and the consumption cost is 2L/h×0.8kg/L×4 yuan/kg=6.4 yuan/h.
Propane cost: The flow process requirement is 0.7m3/h, the purchase price is 7.168 yuan/kg, the density is 1.76kg/m3, and the consumption cost is 0.7m3/h×1.76kg/m3×7.168 yuan/kg=8.83 yuan/h.
Press-hardening efficiency: 11 pieces per hour.
Press and quench labor cost: 1 yuan / piece.
The cost of a single-piece gear is required to be consumed: [(92.16+34.632+6.4+8.83)/11]+1=13.911 yuan/piece.
After the heat treatment of the gear after heat treatment, the price of the semi-finished product was 54.39 yuan due to heat treatment deformation.
The proportion of the quenching cost required to save a semi-finished product is (13.911/54.39) × 100% = 25.6%.
It can be seen that the pressure quenching cost is high and the efficiency is low, and the press-hardening capacity is obviously insufficient. It can only be applied as a salvage means for the deformed parts, and cannot be 100% mass-pressed, which cannot meet the high-discharge demand of the gear.
6. Optimization of fixtures
If the problem of the deformation of the hub surface of the gear can be solved, then the gear can realize the direct quenching process after carburizing is practical. We have tried to find a breakthrough in the structure of the combined fixtures, but failed to do so.
It is necessary to find the root cause that affects the heat treatment deformation in order to make a breakthrough in control. After many tests and analysis, it is concluded that the main reason for the heat treatment deformation of the product is the structural asymmetry of the workpiece. First, the workpiece is placed vertically. When the microstructure is completely austenitized, the gear center is thicker under the influence of gravity. The convex part will produce a certain deformation. When quenching, the gear will make the original deformation trend intensify. Secondly, the part of the gear with thinner effective thickness will undergo the first structural transformation, while the thicker part of the effective thickness will undergo the structural transformation. The relative lag of time causes the different time of the transformation of the austenite structure to the martensite structure in different parts of the same gear, which in turn causes the influence of the tissue stress on the deformation.
Therefore, for such asymmetrical gears, it is not desirable to exhibit a freely deformed state during carburizing and quenching, which will adversely affect the quality and cost control of the gears. We must have a new breakthrough in the direct quenching process, otherwise the process route of our factory has no competitive advantage.
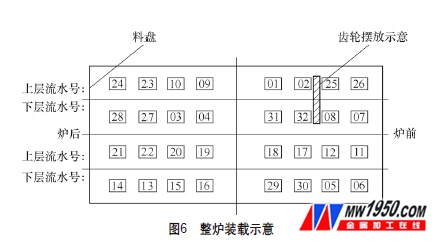
First of all, we made a whole furnace test to find the trend of the movement and deformation of the gear hub surface. A total of 32 gears were loaded, numbered 1 to 32, and the double-layer random standing, the loading mode is shown in Figure 6.
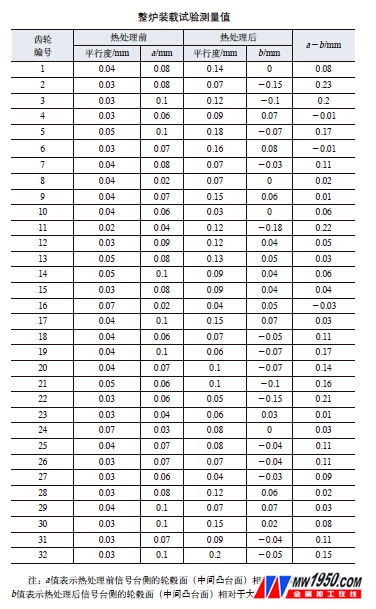
The parallelism of the end faces before and after the heat treatment of the 32 gears and the height difference of the hub face (the intermediate boss face) on the signal table side with respect to the large end faces of the gears were measured, and the measurement results are shown in the attached table.
It can be seen from the attached table that the overall tendency of the central boss to move and deform toward the rear end face of the gear after heat treatment of the gear is obvious, and nearly half of the gear center boss has a translation amount exceeding 0.10 mm.
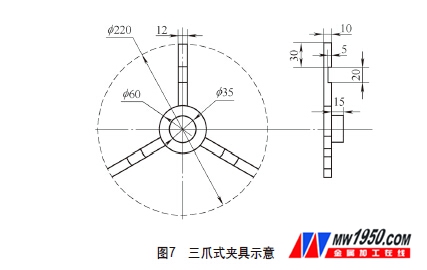
To this end, we designed a simple three-jaw clamp (shown in Figure 7) and the convex surface of the gear is uniformly distributed on the circumference of the three sides, the length of the foot can meet the diameter requirements of the gear in the radial direction, and does not make The outer diameter of the gear is subjected to the influence of the tooling during the heating and quenching process. In addition, we consider changing the traditional furnace loading method, placing the boss surface on the back of the gear flat on the three-jaw jig, and then stacking it on the honeycomb flat plate for carburizing and quenching to hinder the movement of the center boss. the goal of.

The reason why the heat treatment is not directly placed on the honeycomb flat plate is that the small tray has been deformed during the repeated heating and cooling process, that is, the small tray itself has been uneven, and the flatness of the gear is affected. Further, the gear is placed flat on the three-jaw clamp with less contact area than direct contact with the small tray, and three 5 mm deep oil grooves on the three-jaw clamp are also beneficial for quenching oil. Flow cooling has less effect on the consistency of the hardness of the land.
In order to verify the validity of the test, our factory ordered 5 three-jaw clamps in advance, and carried out the process test in different parts of the furnace. A total of 10 furnace tests were followed before and after, and the convex surface of 50 gears did not appear moving deformation. Phenomenon, the flatness is controlled within 0.10mm, which meets the technical requirements. After the grinding process is transferred, since the heat treatment deformation amount is controlled within the reserved grinding amount before the heat treatment, all the test pieces are successfully ground.
The test results confirmed that the movement deformation phenomenon of the boss of the batch of gears was effectively controlled, which laid a foundation for realizing the direct quenching process to shorten the production cycle and meet the batch production.
Although the fixtures designed by our factory mostly use the traditional 3Cr25Ni20Si2 material, the durability is not high, the deformation of the fixture after repeated quenching is also risky, and the simple three-jaw clamp in the test is not cumbersome for the bulk operation. Type clamping, but after all, it provides a certain theoretical basis for us to design the carburizing fixture of this kind of gear.
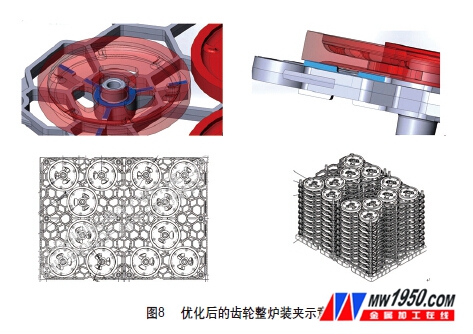
At present, we have cooperated with a well-known professional heat treatment fixture manufacturing company to design a special carburizing tray and fixture suitable for this type of gear bulk batching (see Figure 8).
When considering the life of the fixture, we worked with the partner to optimize the fixture material. The replacement material is HR17Nb, which ensures the service life is up to two years. Its reasonable structural design, that is, the symmetric layout of equal width and thickness can effectively avoid the stress concentration phenomenon, and strictly implement the casting process to ensure that the fixture has no brow defects, and the material composition must also fully comply with the corresponding standards.
After the tooling is in place, we must standardize the use and maintenance process. During the production process, the fixtures need to be flipped over regularly to ease the deformation of the tooling. Under the premise of the increasing demand for such gears, the benefits of the new fixture will become more apparent.
7. Introduction of several personalized practical heat treatment fixtures
The special carburizing clips described above have certain advantages, but they are not versatile and cannot be promoted in all gear products. However, it is difficult to handle all the workpieces by designing a fixture, because the heat treatment fixtures used for different gear structures and heat treatment requirements will not be the same.
In the long-term practice and exploration process, we designed some simple personalized heat treatment tools for some specific structure of the workpiece, and received good results.
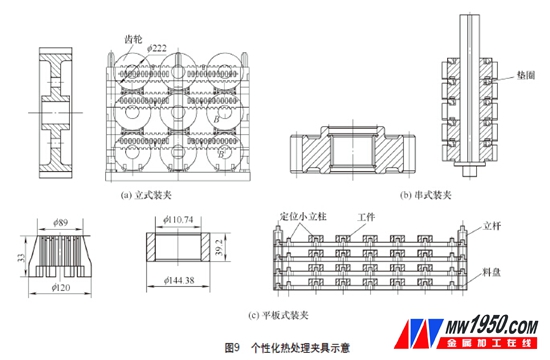
For example, the gear shown in Figure 9a has a symmetrical structure. For this type of gear, we design a versatile combined fixture, which is carburized in the form of a vertical release, which can satisfy the loading capacity to the greatest extent. It can meet the requirements of heat treatment deformation; for the middle bridge driven cylindrical gear shown in Figure 9b, we design a string bar fixture, which puts the gears directly on the string bars every 5 sets, and the string rods pass through the trays. The positioning holes are fixed. Because the width of the workpiece end face of the driven cylindrical gear of the middle bridge is relatively large, and the gap between the diameter of the string bar and the diameter of the inner hole of the gear is relatively small, the gear set can be neatly arranged to prevent the gear from going back and forth relative to the string bar during the feeding and discharging process. For the two kinds of workpieces shown in Fig. 9c, one is the inner sleeve with the internal spline. Due to the structural asymmetry, the cooling speed of the two end faces is large when quenching, if the rods are stacked together, A significant defect after heat treatment is that the internal spline will produce a certain taper; the second is that if the large inner hole thin-walled gear is directly put together by the rod, the inner hole will be elliptical after heat treatment. For these two types of workpieces, we use flat-type clamps or cage-type clamps. The positioning of small columns prevents the workpiece from swaying back and forth, and at the same time, the clamp is forced to prevent the workpiece from being pressed and deformed during the heat treatment.
The above-mentioned personalized chemical fixtures for workpiece matching design with various characteristics have better effects on heat treatment deformation control, and the quality is stable for a long time.
8. Conclusion
(1) During the heat treatment process, the fixture has a greater influence on the distortion of the heat treatment.
(2) The three-claw carburizing fixture of the type shown in the paper is ideal for the heat treatment deformation (the hub surface translation) of the camshaft gear with asymmetrical structure. The large-sized gear adopts the benefits of the overall optimized fixture. Also more obvious.
(3) The charging method of the workpiece needs to be personalized according to its specific structural characteristics. Sometimes some simple fixtures can also receive better results.
About the author: Yang Lan, Cheng Tao, Dongfeng Motor Co., Ltd. Blade Measuring Tool Factory.
Bottom Cup
GUOLONG PRECISION VALVE CO.,LTD , https://www.glstovevalve.com
